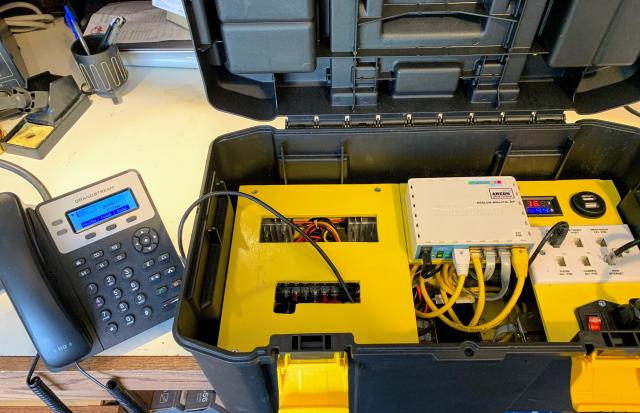
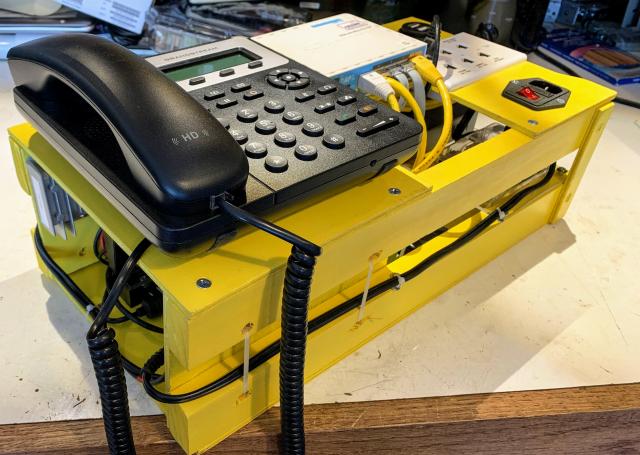
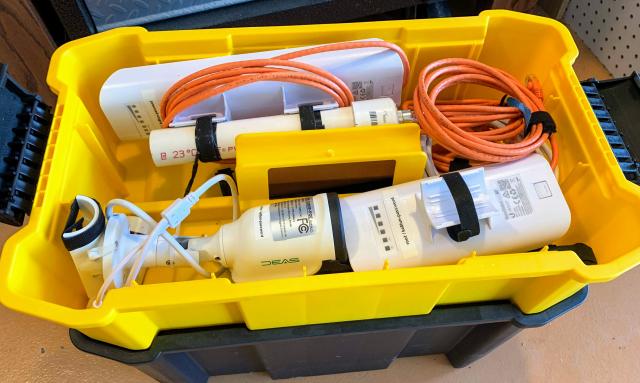
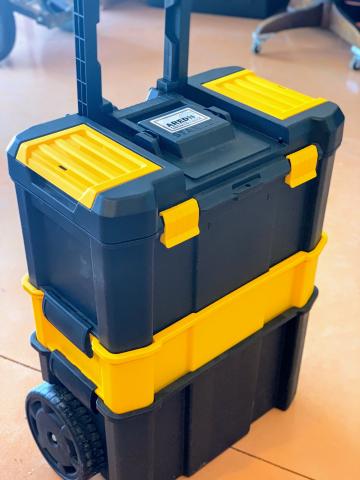
This is my second iteration of a Go-Box for my AREDN Mesh equipment. It is actually two boxes - one as a "base" node and the second as a "remote/bridge" node. I had several goals in mind when building these units: (1) a kit that can have all (or almost all) of the necessary components together in one place, (2) easy setup of an AREDN node at a special event or emergency deployment, (3) be able to experiment with the hardware in my home without having cables and power supplies all over. The base system is housed in a Stanley roll-around tool chest from Home Depot ($29!!). It looks to be a slightly different version of N2MH’s Stanley toolbox as shown in https://www.arednmesh.org/content/please-meet-stanley (the initial inspiration for my kit). All of the active components are built in a wooden insert that fits into the upper portion of the Stanley toolbox.
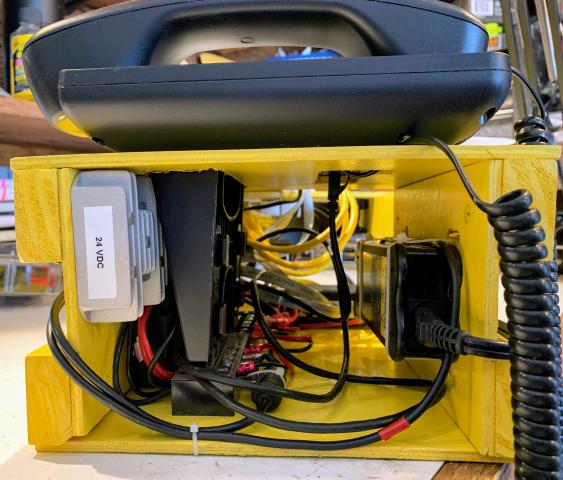
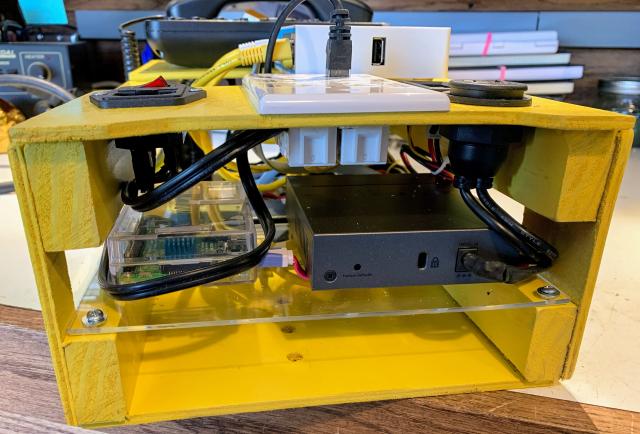
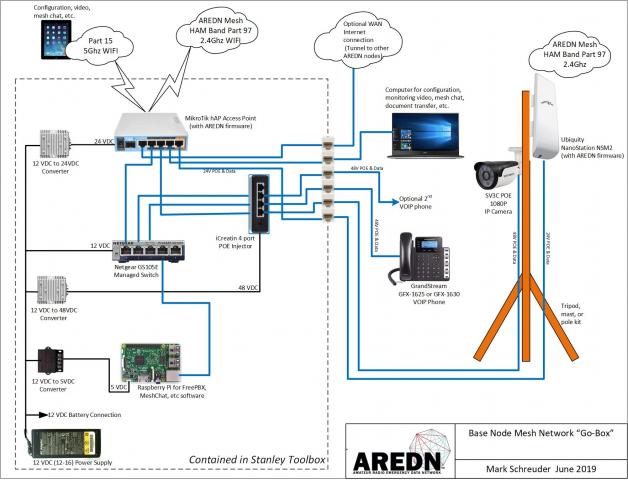
The system is based around a MikroTik AP router with the AREDN firmware loaded. Additional equipment includes a Netgear GS105E managed switch, a GrandStream 1625 VOIP phone, and a Raspberry Pi running FreePBX software. The box is powered by an old IBM laptop brick that provides 16 VDC at 4Amps, plenty for this system. Three DC to DC converters provide 5 VDC, 24 VDC, and 48 VDC. I will be adding Anderson Powerpole connectors so that this can be run off of a 12 VDC battery. The 24 VDC is used for the MikroTik AP router, which in turn provides the 24 VDC POE on port 5 for connecting a Ubiquity Mesh Radio. The 48 VDC is sent to a POE injector for a pair of Grandstream phones and an IP camera. The 5 VDC is used for the Raspberry PI and also powers a pair of utility USB connectors. The Netgear switch is labeled for 12 VDC, but is happy running off of the 16 VDC directly from the power supply brick. All of the ethernet connections to the outside world were brought out to a wall plate with 6 keystone RJ45 jacks to keep connections simple.
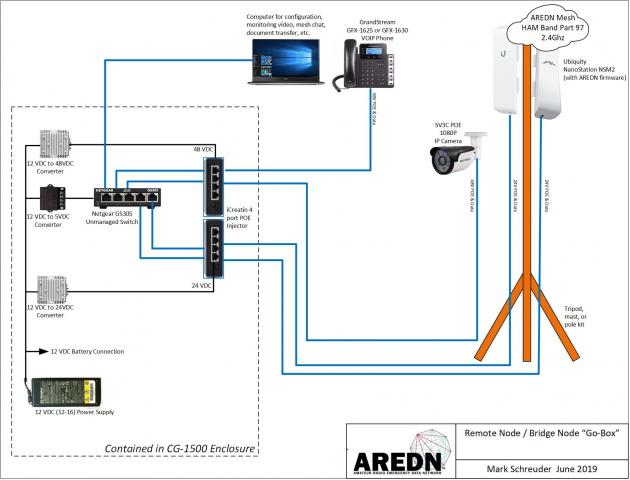
I could have used an unmanaged Netgear GS305 switch, but I had the managed version on hand and decided to install it to give me the option of configuring VLANs if the need arises.
The middle portion of the Stanley box is a perfect size for a pair of Ubiquity Nanostation radios and an IP camera as well as some network cables and assorted hardware. The base section of the Stanley box currently holds power and network cables, but will eventually hold a larger 12 volt battery.
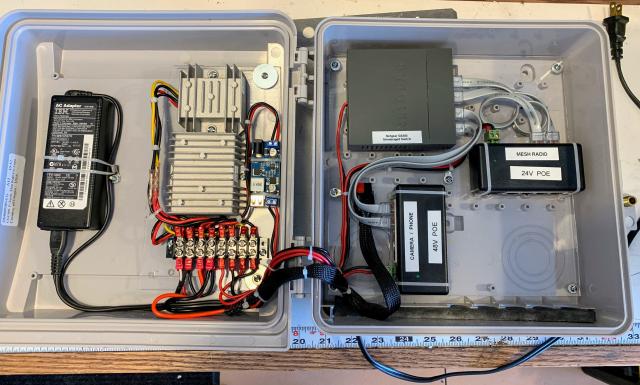
The version 2a box will serve as a remote or bridge node with the ability to power two Mesh radios, an IP camera, and a VOIP phone. This box consists of a Netgear unmanaged switch, a 24 VDC POE Injector, a 48 VDC injector. There is also one remaining port on the switch to direct connect a laptop if necessary. Powering this is a 16V/4A IBM Laptop Brick power supply, and an assortment of DC to DC converters (5V, 24V, & 48V). All of this is housed in a CG1500 enclosure (not ideal, but I already had one). There is an Anderson Powerpole connector for eventually powering this from a 12 VDC battery.
You are here
AREDN Mesh “Go-Box” (version 2 and 2a)
Tue, 06/11/2019 - 21:41
#1
AREDN Mesh “Go-Box” (version 2 and 2a)
Theme by Danetsoft and Danang Probo Sayekti inspired by Maksimer
-Damon K9CQB
When I was putting Stanley together, I looked at both versions of the roll around toolbox: the one available at Home Depot and the one from Lowes. I found they were both similar in size. But, the one from Lowes was more suitable for my purposes. Alas, Stanley is probably one of a kind. If you go to Lowes, the same toolbox now has the Craftsman brand. I would now call it "Crafty"....
What kind of tripod do you use? I'm partial to the Ridgid tripod, also at Home Depot:
https://www.homedepot.com/p/RIDGID-Hybrid-GEN5X-Universal-Collapsible-Tripod-Lighting-Stand-with-4-1-4-in-20-Threads-for-Mounting-R9937B/207041034
It has 3 arms with 1/4-20 threads which can also be used for camera mounts. Also, L-brackets can be drilled and tapped and used for mounting nodes.
I'll have to remember the yellow paint for the internal parts. Nice touch!
73, Mark, N2MH
Wow-what a great visual and write up. Thank you for sharing.
It's very annoying that UBI are 24v items! I found using an in-line step down from 48v POE to 24v POE for the UBI items - and keep 48v for everything else kept it simple rather than running 2 standards.
Wade
VK1MIC
they will run fine on 12V as long as your PoE cable isn't too long (and voltage drops below 10.5v)
James Good
kd5vxh
https://www.arednmesh.org/content/please-meet-stanley
https://www.arednmesh.org/content/my-stanley-go-box-version-20
https://www.arednmesh.org/content/aredn-mesh-%E2%80%9Cgo-box%E2%80%9D-version-2-and-2a
https://www.arednmesh.org/content/aredn-mesh-%E2%80%9Cgo-box%E2%80%9D-version-2-and-2a