
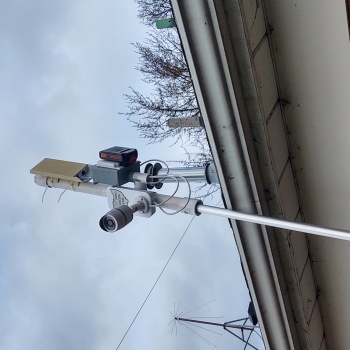
I've reconfigured my portable equipment, and thought the group might be interested in this. It's a completely self-contained pole-mounted go-kit. No wires dangling down to the ground. This is all powered by the 20V lithium batteries my trimmer takes (In this case Black & Decker, but you could make it work with just about any brand). The node demonstrated is my Nanostation, which I use as a test node, though I intend on putting my MantBox on there instead. On the side, the box with the NWO Aredn Mesh logo is a Mikrotik outdoor grade 2.4GHz access point, running on channel 11. I used short screws, and carefully screwed the IP camera directly to the cable cover of that access point. A full parts list of this deployment will follow at the end. The grey box the battery is hanging off of will be detailed further down.
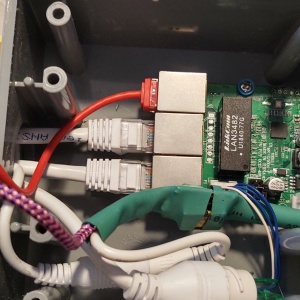
The grey box on the side is where the power is connected, and houses the POE switch, voltage regulators, and another radio to connect out to another access point to provide local internet capability to devices (or to share out to the mesh if desired). Inside is pretty cramped, but very functional. I have 2 shots inside the box to show how it's packed with the GL-MT300N router. Inside the green heat shrink is a 20-28V to 12V voltage regulator, with a 5V linear voltage regulator soldered on to the output. I use the 12V output to power the camera (a NON-poe model) and the 5V output soldered on to a short micro-usb lead to power the GL-iNet. The GL-iNet is configured to provide it's LAN connection out VLAN 2 on both ports. To allow for a tighter bend radius, and to make installation easier, the red ethernet cable is a micro-ethernet cable from Monoprice. The white ethernet cables are 2ft cables to go to the equipment. The 4th ethernet port is really only made for 10-base-T, and comes off a pin header. I use that to go to the IP camera. The switch is mounted with two stud mounts as would be used to secure a PC motherboard to it's case. I simply drilled undersized holes in the plastic to mount those to the back of the box. The voltage regulator uses wires soldered to the back of the power pins on the switch.

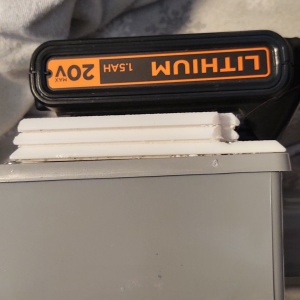
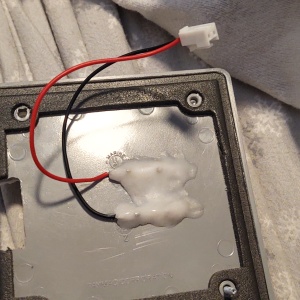
The magic of all this, though is the battery plate. I forgot to take pictures while I was assembling this, but it's pretty easy. You start with your battery.
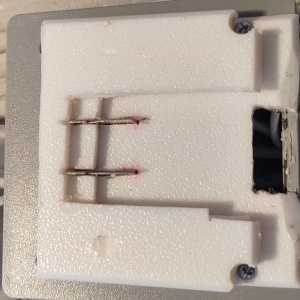
You'll need to find a couple metal pieces for your contacts, I happened to use two spare battery contacts from a bad charger, otherwise a couple flat brass or 1/16in thick pieces of nickel plated pieces would work. You'll also need the box cover, and 3 plastic wall guards. Start by securing the first wall guard to the cover, all the way to the edge. Mark where the securing latch fits, and cut a hole for it. Also mark where the contacts fit to. You'll need to cut slots for those. You'll need to watch the end profile of your battery, mark, and cut the other two wall guards to fit your battery's mounting profile as well. You may need to use a dremel to make them slightly thinner. Carefully assemble them. I used a little instamorph on the inside to secure and insulate the contacts. Careful alignment of all these parts at assembly is key, as without it, you might not get your battery to go in.
The grey box is a standard outdoor PVC 2-gang box, with a 1in fitting. The main mast is about 2ft of 1 1/4 PVC pipe. The T fitting in line with the main fitting has a 1in side port. A 3/4in PVC T is used on the side, as it's OD is effectively the same as 1in PVC pipe. At the bottom, I use a standard 1 1/4 threaded female fitting. This can interface with a previous speaker-stand adapter I built for other go-kit antennas. It can even mount on top of the HF Dipole center I made. The reason for 1 1/4 pipe is that it also fits nicely around a standard pool cleaning extension pole. Though, for even more flexible mounting, in the top, I have a 3/4 threaded fitting that fits 1in PVC connectors carefully glued inside the pipe, with shapelock/instamorph/friendly plastic crammed inside while I had a metal extension pole in there as well. I then put a standard 1 1/4 coupler on the outside, with a reducer to a 1in female pipe connector on the top, so I can add on a VHF/UHF antenna mount above the whole unit if desired for operations on repeaters when this is set up in the field. With the batteries I currently have, I estimate operating times of about 1H per AH of battery capacity (1.5AH battery shown, I also have 6AH batteries).
Parts list is as follows:
Structural/enclosures:
Approx 2 ft of 1.25 PVC pipe. Length not critical, adjust for how you would like your equipment to sit.
1.25/1/1.25 PVC T fitting
.75/.75/.75 PVC T fitting
2-gang 1-hole 1in PVC weatherproof outlet box
2-gang flat PVC waterproof cover
4x4 wall protectors (qty 3)
1.25 Socket FIP adapter
1in to .75 FIP reducer cap
1.25 coupler
1.25 to .75 reducer
Cables
2x 2ft ethernet cables. Indoor grade is OK for intermittent use, outdoor grade is recommended for extended outdoor use. I used white, but color would be at your preference.
.5 ft microslim ethernet cables such as these from Monoprice https://www.monoprice.com/product?p_id=34256. I used red here, but any color would be fine.
Electronics:
Any 24V POE node (Ubiquiti Nanostation shown)
24V POE outdoor grade access point (Mikrotik RBwAP2nD shown)
12V non-POE IP camera (most come with about a 2ft lead)
POE Switch board - 3 port (I can't find the one I used, but this is a gigabit version, with 4 mounting holes instead of the 2 my 10/100 version had) https://www.aliexpress.com/item/4000245414306.html?spm=a2g0o.productlist.0.0.5a393589y5O6cL&algo_pvid=c694b754-3234-415c-8d20-8a2b1e1ad340&algo_exp_id=c694b754-3234-415c-8d20-8a2b1e1ad340-48&pdp_ext_f=%7B%22sku_id%22%3A%2210000000993965481%22%7D
GL-iNet GL-MT300N travel router (to provide internet access). This unit also includes a managed switch, you can configure the two ethernet ports to pass untagged traffic, and to tag the LAN network as VLAN 2 to feed internet to the node.
24V to 12V regulator (https://www.aliexpress.com/item/4001184669298.html?spm=a2g0s.9042311.0.0.27424c4dcnW5eZ)
7805 Voltage regulator
EDIT: I found the switch that I used: https://a.aliexpress.com/_mKKM0nk
EDIT 2: Instead of making your own battery mount, there are some pre-made with wire leads... https://www.amazon.com/Wheels-Adapter-Decker-Connector-Robotics/dp/B0918...
Chrissy, what a great project. Very clever use of the standard 20v battery packs to power everything. Thank you very much for posting all the details and the photos. You're an inspiration!