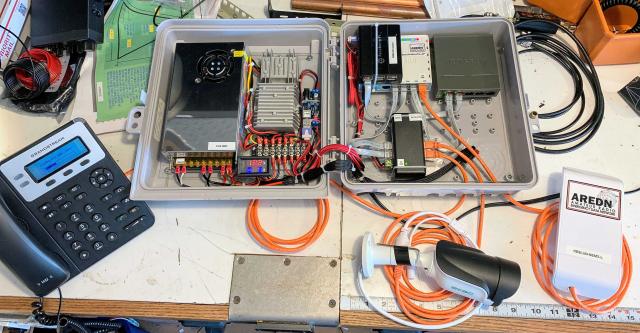
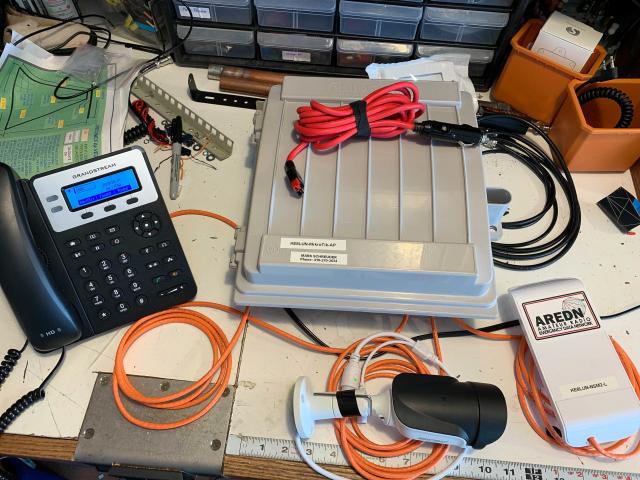
I wanted to share my first attempt at a “Go-Kit” for Aredn Mesh equipment. This is very much a work in progress, but I thought sharing it here in it’s current form might solicit a little advice, and maybe give some ideas to other newbies like myself that are just getting started with Aredn.
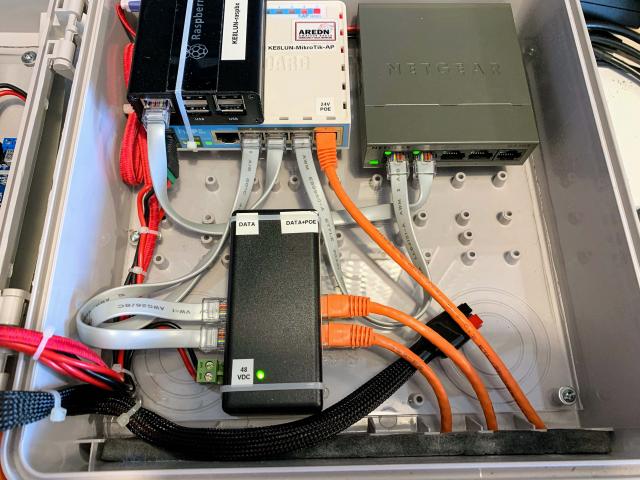
The system is pretty simple: A MikroTik AP router with the Aredn software loaded, a Raspberry Pi with FreePBX, and a “dumb” Netgear GS305 switch. I currently have a Grandstream 1625 phone, an SV3C video camera, and a Ubiquiti Nanostation M2 Loco attached to the box. The dumb switch gives me extra ports to directly connect a laptop, and I can connect to my home internet through the WAN port 1 of the MikroTik AP.
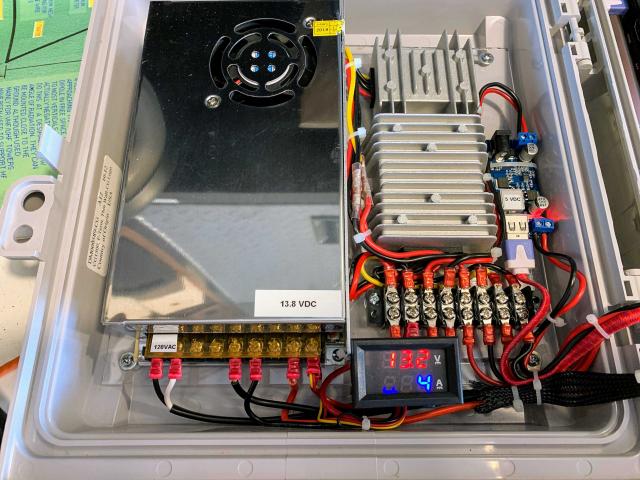
Currently everything is mounted in a Cableguard CG-1500 enclosure. It is really too small, but I had one already lying around. I included a link to one on Amazon, but I would shop around – I think I paid less than $20 a couple years ago for this one. Similarly, the 12Volt power supply is wildly oversized at 30Amps, but I already had it from another project. I used some simple 1/8” Lexan (plexiglass) sheet as mounting plates on each side of the enclosure.
I have three voltage converters to generate all the necessary voltages from the 12V supply. A small 5V converter powers the Raspberry Pi and the Netgear switch. A 24V converter powers the MikroTik AP. I chose 24V so that the POE port of the MikroTik would be able to directly power another Ubiquiti Nanostation Node. Finally a 48V converter supplies POE power for the Grandstream phone and the video camera. A very cheap volt/amp panel meter is attached just to keep an eye on the power supply. Currently with everything connected it draws slightly less than 1 amp from the 12V supply (desplite what the picture shows...) I added some PowerPole connectors to the output of the 12V power supply so I can try running this off a cigarette lighter cable.
Over the summer I hope to deploy this at special events in the area (air show, marathons, etc). There is no mesh backbone yet in my area (Toledo, Ohio), so this will primarily be used as a test bed in my home. It was worth constructing it just to consolidate everything in one place and minimize cables and wall warts all over my desk. I anticipate starting to set up Aredn Mesh tunnels to other island users in my area.
Potential Enhancements:
I looked at the Stanley roll-around toolbox at Home Depot and I really like the size and price. My thought was to be able to house the phone, MikroTik AP, and the Raspberry Pi in the top section along with the three voltage converters. I am thinking about Anderson Power Pole connectors to allow using the top box by itself with a larger 12V 4A brick power supply, or connect to an external battery or car power. I am thinking about the bottom box to house a 12V battery (for remote deployment) and storage compartments for a camera and Nanostation node, and miscellaneous cables. The tripod or mounting pole for the Nanostation would be separate as would a case for my laptop (to wirelessly connect to the MikroTik AP). I might add another Raspberry Pi for MeshChat – but I need to learn more about pros and cons of that.
For reference – here are Amazon links to the components I used:
12V 30A Power Supply:
https://smile.amazon.com/BMOUO-Universal-Regulated-Switching-Computer/dp/B01EWG6YT8/ref=sr_1_2_sspa?keywords=12v+30a+power+supply&qid=1559343143&s=gateway&sr=8-2-spons&psc=1
12V to 5V converter:
https://smile.amazon.com/gp/product/B01NALDSJ0/ref=ppx_yo_dt_b_asin_title_o06_s00?ie=UTF8&psc=1
12V to 24V converter:
https://smile.amazon.com/gp/product/B01H83130M/ref=ppx_od_dt_b_asin_title_s00?ie=UTF8&psc=1
12V to 48V converter:
https://smile.amazon.com/gp/product/B06X1BR5G6/ref=ppx_od_dt_b_asin_title_s00?ie=UTF8&psc=1
4 Port POE Injector:
https://smile.amazon.com/gp/product/B00SU9DNDY/ref=ppx_od_dt_b_asin_title_s00?ie=UTF8&psc=1
Volt/Amp Meter:
https://smile.amazon.com/gp/product/B072BY4XZ7/ref=ppx_od_dt_b_asin_title_s00?ie=UTF8&psc=1
DC Power Jack Connectors:
https://smile.amazon.com/gp/product/B07KZ97Q4L/ref=ppx_yo_dt_b_asin_title_o05_s00?ie=UTF8&psc=1
MikroTik hAP ac lite Dual-concurrent Access Poin
https://smile.amazon.com/gp/product/B019PCF3QY/ref=ppx_yo_dt_b_asin_title_o00_s00?ie=UTF8&psc=1
Netgear GS305 unmanaged switch:
https://smile.amazon.com/NETGEAR-Ethernet-Unmanaged-Internet-Splitter/dp/B00QR6XFHQ/ref=sxts_sxwds-bia?keywords=Netgear+GS305&pd_rd_i=B00QR6XFHQ&pd_rd_r=4079a210-874d-4f7d-b0cc-8f23e5cc29ca&pd_rd_w=LzAqf&pd_rd_wg=NelYt&pf_rd_p=f0479f98-a32d-45cd-9c12-7aaced42b1ec&pf_rd_r=3BYWZ2XNSFYR76A5S5XP&qid=1559343498&s=gateway
Enclosure – Cableguard CG-1500 Demarcation Enclosure:
https://smile.amazon.com/CableGuard-CG-1500-Coax-Demarcation-Enclosure/dp/B00EKKDRTM/ref=sr_1_1?crid=RRC0ECQKGKHR&keywords=cg1500+enclosure&qid=1559343576&s=gateway&sprefix=CG1500%2Caps%2C141&sr=8-1
You are here
First Attempt at a Go-Kit
Fri, 05/31/2019 - 20:14
#1
First Attempt at a Go-Kit
Theme by Danetsoft and Danang Probo Sayekti inspired by Maksimer
One consideration is if you wish to build into the design an ability to operate with minimal power consumption and stay operational as long as possible in a worse case scenario of limited supply. If so, consider devices all running at 12v to avoid loss of power conversion. A Rasberry Pi can be feed off the hAP ac lite USB pass through 5v power, and unavoidable step down. ~1 node can be on the hAP ac lite dtdlink POE pass through on 12v if not too long a cat5 cable. A 12v ATA device with low power analog phone can be used, e.g. grandstream HT701. This also simplifies the cabling, power distribution, and can all fit in a relatively small package.
Joe AE6XE