Mikrotik has a huge variety of routers, wifi devices, and circuit boards (“RouterBOARDs”) which all run their RouterOS. They also have some switches running SwitchOS. We will concentrate on the Routers as they are most flexible for what we are doing. Below is guide on configuring these devices to support AREDN nodes and hosts, Pi, phones, cameras, etc.
A number of models support passive PoE compatible with Ubiquiti devices. The voltage you put in on the DC jack is what comes out the PoE. Some also support powering the device on port 1, while also passing that power on to one or more of the remaining ports. Most will work from 8-30V, some up to 50V, and some will do regular 802.3af/at. My nodes are fed 24V thru several models of MikroTik’s. All of it should work from 12V if your cable lengths aren’t too long. I have some 150ft runs to the roof so I standardized on 24V.
The devices can be configured via Winbox.exe a Windows application, via built-in web page, or CLI via telnet/ssh. I prefer using Winbox and the screenshots below are from that. The web page is very similar to Winbox.
I set up my systems with the following parameters:
-The MikroTiks are used only for the AREDN network. They are on longer-running dedicated backup power separate from the main network stuff. The MikroTiks power the nodes directly via passive PoE. Raspberrys and VoIP phones are also powered from this backup power source so they are connected directly to the MikroTik. Other stuff goes on to my main network.
-VLAN 30-39 is the range that fit into my VLAN scheme. You can use whatever you want of course. As is best practice on secure production networks, I do not use or allow traffic on VLAN 1. VLAN 1 traffic (WAN) from the nodes, which is always tagged VLAN 1 in the AREDN code, only exists on the cable to the node. It is bridged to VLAN30 within the router. VLAN30 is passed to a dedicated port on my firewall for the nodes’ internet access & tunnels. In a standalone operation or if you don't care, leave it on 1 of course, and replace all instances of #30 in the examples with #1.
-Full PC’s, laptops, and anything else is passed on to the main network on VLAN 31, 32, etc. for each node’s LAN subnet.
-I do have MikroTik’s with built-in WiFi serving it up from the nodes' LAN subnets. I will work on that tutorial later.
I will leave the device basics up to you to figure out and learn ;) I recommend blowing out the default config as it may have NAT and Firewall stuff going on. Assign a temporary static IP Address to the last port on the device and plug your computer in there so you don’t lose connectivity while messing with the rest of the ports. One nice feature is that using Winbox, you can connect to the device by MAC address even if no IP is assigned or you "cut yourself off" with a config error. Make sure to update with the latest firmware while you have an IP connection as file transfers are iffy when doing the MAC-only connection.
With XM vintage nodes recall that LAN, WAN, and DtD all come down the same wire from the Main port. With M5 XW’s we see the LAN untagged on the Main port and WAN and DtD tagged on VLAN 1 and 2 on the Secondary port. Let’s start with an XM based node. The first step is to configure your interfaces and VLANs. If you are only connecting a single node, are not using DtD and WAN functions, you can skip this. Under the Interfaces tab, Click the + tab and add a VLAN. I have named this one ‘ether2-vlan1’ indicating it will be the tagged vlan1 traffic from the ether2 interface. Configure ‘VLAN ID: 1’ and select ‘ether2’ as the interface and click OK. Repeat for VLAN 2. Do this for each interface that will have a node on it.
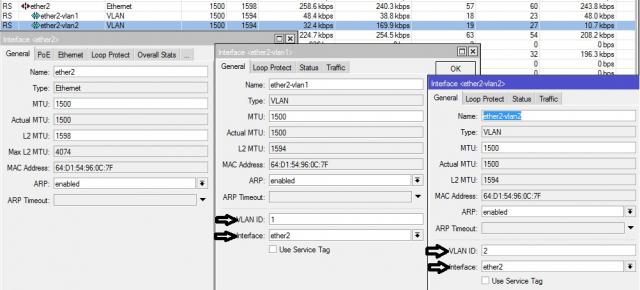
For an XW revision node using WAN and/or DtD you will need two physical ports. The Main port will have no VLANs configured on it; leave this one alone. The Secondary port will need the VLAN 1 & 2 treatment above. Note that on this second port, only the two VLAN sub-interfaces are used. The native port (untagged) is ignored.
In my example I use the SFP port (fiber) for an uplink to the main switch but it is configured like any other ethernet port. It carries both node LAN’s and the WAN.
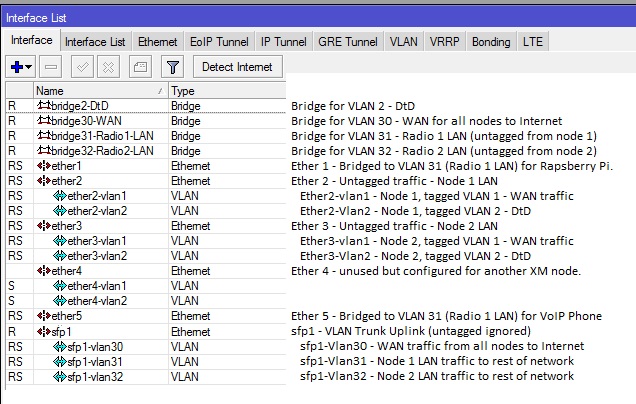
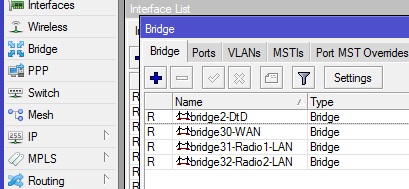
Open the Bridge button on the left and create Bridges for DtD and WAN and however many LAN for each node you have. The name is the only parameter you need.
In the Bridge window, click on the Ports tab. Now the fun part. Here we will connect the appropriate things together. We will be connecting the ports that represent the VLAN-tagged interfaces and well as native ethernet ports (untagged) to Bridges which are just a virtual port within the router. Click +. then select the Interface and which Bridge it will belong to and click OK. The vlan2 ports will all go into the DtD bridge. The vlan1 ports will go into the WAN bridge (Also note that I add in VLAN30 on my Uplink port to this bridge). Finally, each node’s LAN port is assigned to its own Bridge. This allows us to “steer” any end-user device onto a particular node by adding the ethernet port it is plugged into to the appropriate Bridge. For example I can double click on ether1 below, change it to Bridge32 and now the Raspberry is on radio 2's network. Renew the Pi's DHCP lease and go.
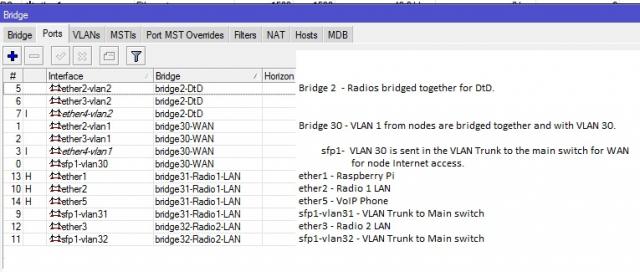
Please note I did a little photoshopping to remove excess ports for clarity. The # column is arbitrary. Not all ports may be ‘up’ or used at all.
In this bridge list from another site, we see a 2nd switch is connected and all VLANs are passed to it on ether1. XW Node 1 is connected on ports 2 & 3. XW Node 2 is on 4 & 5.

You will also want to put a password on the MikroTik (System/Password), change the identity to your hostname (System/Identity).
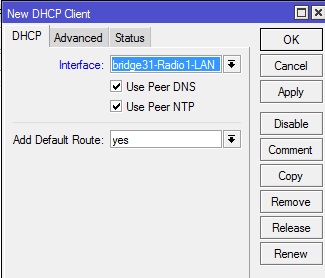
You can assign the MikroTik itself an address via DHCP from a node. Here we request one from Radio 1 and add the default Route and DNS the node gives out.
Once everything is working, open New Terminal and type ‘export’ to view your work in the CLI!
Ian
Thanks for sharing this. I'm interested in buying a MikroTik Router to see how it works in in my setting. I have a few AirRouters and an EdgeRouter X that work fairly well. Seems like the MikroTik might provided additional featuers. Does it matter what version of RouterOS is used? On MikroTik's site I see a range of RoutersOS from L3 to L6. Do you have recomendations on a good device to start with? I'd like one with at least on PoE out but more is better and I like the idea of an SFP port. In a scan of devices I didn't see one that had 4 Ports, PoE, SfP and Wifi. I'm OK adding a AP to one of the ethernet ports if needed.
So in a nutshell I'm interested to know what RouterOS you use and/or recommend
What device can you recommend?
Thanks
Derek
I have used the 'hEX PoE' as a base for two of my node sites. They have PoE on 4 of 5 ports plus an SFP. I feed them with 24v on the DC connector and then you can load them up on all 4 ports without worry. The whole thing will run at 12v too, provided the nodes' cable runs aren't too long due to voltage drop. The voltage on the DC connector is what the ports output. It will also power up via port#1 by passive PoE but then the overall output current is limited. The only thing it is missing is WiFi. I also have a 'hAP ac' stacked on top at one site as it gave me wifi and 5 more ports for things like a phone, raspberry pi, etc. Those XW version Nanostations suck up ports fast!
The OmniTik 5 PoE ac does have 5Ghz Wifi and I've built a portable node around that. It's big tho, meant to put on a pole or wall!
A 'hEX PoE' and a 'wAP ac' or 'hAP ac' would be a good combo to get 4 PoE, an SFP, VLANs, 2.4/5.8 wifi. The 2/5Ghz sides of the radios are independently configurable. All of their AP's, even the matchbox sized 'mAP lite', let you map different SSIDs to different VLANs.
If you need an outdoor solution the 'PowerBox Pro' is the same thing in an outdoor case. Yes it's actually a full router not just a fancy PoE injector.
I think there is a new CRS112 model that has 8 ports of PoE and some ability for dual PoE voltages, but still no onboard wifi, and it starts to get expensive.
Ian
Ian:
I was looking for an omnidirectional 5Ghz Mikrotik radio with built in antenna to use for Aredn and like the OmniTIK 5 PoE, but it's not on the compatible list.
(this one: https://www.ebay.com/itm/284764482738?epid=727650132&hash=item424d492cb2:g:YMMAAOSwfuRiS2gi&amdata=enc%3AAQAIAAAA4CF51aKR3riNlUFS26jrAHQwxtFSzHuQfJzR1YVoRRl8bYxTA52aHDxMrItz5d%2B%2FiCIIPCpIVDI3S2RqXap%2F1hia9%2B4WnIsvPrM25wifu3cLaFTcrfdobK6IAznheUkunuLP1ndWerI7PX90HOIVvGLORIxoAiM3tV16DXhGeO0yBPmZ0uT23ML0CpOVS8xFatXdRZhIuN1ynq3pl7fwS0R0gqnZlRMjcoTFUa91RGsYpK%2Fd7vvYnD645RVf%2Be2X1O5N8OpPz4OceaoxNlkwfItaWGDW5Jwg4MfMyFEdJ%2BPG%7Ctkp%3ABk9SR9Kl6orbYg )
Did you get this model running with aredn firmware? If so which firmware did you use to flash it?
Thanks
But wow, I sure like the idea of the OmniTIK as a non AREDN device on the LAN side of things. I didn't realize it also could be a pass thru POE switch. Sweet. Can anyone with first hand experience using this device tell me ... if I give it 24VDC POE how far will it provide a part 15 wifi signal (without walls, trees)? Is this much more powerful than typical commercial APs that are used in public buildings like the Ubiquity 6?
Ed
Of course I understand the distance a mesh Omni can throw compared to three Sectors. I've done both. I have one hospital testing a Ubiquity Omni where the entire campus is within a half mile. One antenna on a pole paints signal outdoors where another building isn't blocking it. I can hit it with a CPE easily. Where we failed spectacularly was trying to get signal only 100m away with clear los but from inside a window. Apparently the hospital has some low E windows which are amazing at blocking rf.
Ed
At 100 meters, did you try going through the wall instead?
73, Chuck
Ed
Sectors or point to point dish/panels will always win in that case.
+1 with Ian.
Unfortunately, I don't get it running.
My intended setup is:
WAN Port 1, LAN Port 2-4, DtD Port 5.
AREDN Node is a Nano Station Loco running 3.19.3.0 firmware.
The router is a MikroTik RB952Ui-5ac2nD HAP AC Lite.
I followed your instructions. Result is, that my PC and the router get a DHCP address from the Loco, but the Mikrotik isn't able to get a dhcp address from my home internet router. Thus, the loco has no WAN IP and my PC is also not able to access the internet.
I have some questions concerning the VLAN config.
Using your VLAN 30 or removing it and changing the bridge name to vlan 1 (and the settings on vlan1_ether1) has no effect, I also get no internet.
VLAN 31 isn't assigned in the Mikrotik. Since I don't use another switch for assigning vlans at home, I would have to configure something similar to your vlan 31 in the mikrotik, I think?
I finally got it running using cli commands according to the mikrotik wiki based on a vlan bridge configuration. I can post the details tomorrow.
I have set up the following config:
Port 1: WAN
Port 2-4: LAN
Port 5: DtD
VLAN 1 and 2 are used according to the AREDN documentation, VLAN10 is used for LAN traffic.
The first step is to reset the current configuration e.g. via winbox and check "no default configuration" and "no backup".
Here the necessary CLI commands to set up the VLANS on the mikrotik router:
Additionally, it may be intended to enable the DHCP Client on certain ports, depending on your local IP and network structure.
Look here for AREDN compatible Wi-Fi routers:
http://downloads.arednmesh.org/firmware/html/SUPPORTED_DEVICES.md
73, Chuck